Application-response dialogs and transposing form data
Learn how to add interactive features to PDF forms.
In this tutorial, learn how to add interactive features to PDF forms.
Acrobat JavaScript offers a wealth of opportunities for adding dynamic features to your PDF files. Such as creating dialog boxes where users add data, and then either Acrobat (or Reader ) can be used to do something with that data.
For example, let’s say you have a product catalog describing point-of-purchase items, and on one page it includes an order form. You want the user to select an item on the catalog pages and send the data to the form page. The catalog pages provide the descriptions of the products, and the order form is like a shopping cart that shows the results of the order. In this example, you need to create an application-response dialog box to determine the order, and a script to send the data to the form.
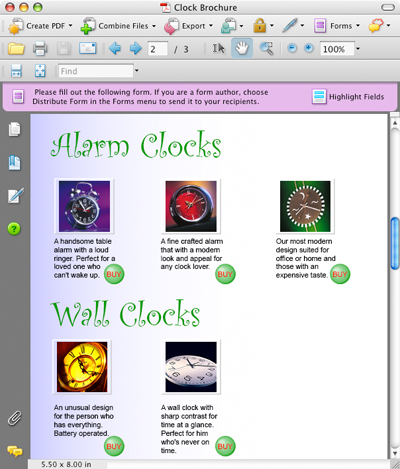
Figure 1 shows a sample catalog page for ordering designer clocks. The Buy button opens a dialog box where the user specifies the number of items to be ordered.

Figure 1
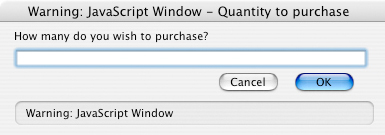
When the user clicks a Buy button, an application–response dialog box opens, as shown in Figure 2. The user types a value in the dialog box and the response is added to the order form residing on another page in the document.

Figure 2
To create the application response dialog box and transpose the data from the dialog box to the order form, you need some JavaScript code. The Buy button contains the following script:
var t = this.getField("qty.0");
// the target field
var cResponse = app.response({ cQuestion: "How many do you wish to purchase?", cTitle: "Quantity to purchase"});
if (cResponse == null){
	// if Cancel is selected
	app.alert ("Cancel order for this item?");
	cResponse = 0;
}else{
	// places the data from the dialog to the target field
	t.value = cResponse;
}
I start this script by assigning a variable to the field name on the order form where the data for the first radio button will be placed. Following the first line is a comment appearing after //.
The next three lines of code set up the application-response dialog box. The question How many do you wish to purchase appears in the dialog box after the user clicks the Buy button.
The if…else routine provides an option for the user to cancel the order for the respective item, in which case no data is sent to the order form. If the user clicks the OK button, the data typed in the dialog box is sent to the order form.
To add the script to other buttons, copy the JavaScript after you’ve tested it and just change the target–field name. In the example shown here, the first target field is qty.0. The next button has the same script, but the target field is qty.1, and so on.
The example shown here works in both Adobe Reader and Acrobat. If you want to transpose data to another file, you need to use Acrobat. Reader doesn’t support sending data to secondary files.
After you finish adding all the scripts and testing the file, enable it with Adobe Reader usage rights so Reader users can complete and save the form. If your catalog is a large file, you can choose to have only the data sent back to you (instead of the entire PDF document). This option can be set in the Submit Forms Selection dialog box I discussed in last week’s article.
"Read more Acrobat 8 tips from Ted Padova in the
"Adobe Acrobat 8 PDF Bible," available from Amazon."
Related topics: |
PDF Forms, JavaScript |
Top Searches: |
Convert existing forms to fillable PDFs fill and sign any formEdit PDF create PDF Action Wizard |
Try Acrobat DC
Get started >
Learn how to
edit PDF.
Ask the Community
Post, discuss and be part of the Acrobat community.
Join now >

0 comments
Comments for this tutorial are now closed.
Comments for this tutorial are now closed.