Automating placement of annotations
Learn about automating the creation and placement of markup annotations on a PDF with Acrobat JavaScript.
Scope: Acrobat 5.0 and later
Skill Level: Intermediate and Advanced
Prerequisites: Basic Acrobat JavaScript Programming
Automating placement of annotations
or
(Converting coordinates in Acrobat)
Automating the creation and placement of Markup Annotations on a PDF with Acrobat JavaScript is very similar to automating the creation and placement of form fields. But there are some major differences. Probably the biggest difference is the coordinates used for placing the annotation at a specific location on the page. The locations of all form fields are specified with a rectangle in Rotated User Space Coordinates, while Markup Annotations are specified in Default User Space Coordinates using a variety of structures; rectangles, points, gestures, and quads (whatever is appropriate for that particular Markup Annotation type). To correctly place an annotation on a PDF page from Acrobat JavaScript, we have to understand the difference between these coordinate spaces, how to convert between them, and how to specify the coordinates to the Acrobat JavaScript doc.addAnnot() function.
Coordinate spaces
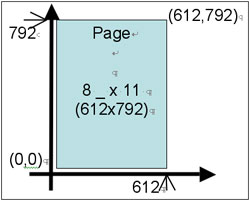
The geometry of each page in a PDF can be described by one of two coordinate systems, Default User Space or Rotated User Space. The difference between these two coordinate spaces is due only to rotation, page size and cropping — but not scaling, which would really complicate things. The units for both rotated and default spaces are “points,” where 72 points equals one inch. For example, a standard-letter-size piece of paper is 8.5 x 11 inches, or 612 x 792 points (Figure 1).

Figure 1 – Default User Coordinates for letter size page
Default User Space represents the un-rotated, uncropped page. The origin (or zero point) is at the bottom-left corner of the Media Box. The Media Box is supposed to represent the actual paper size on which the page will be printed. Although this isn’t always strictly true, it’s a good way to think about it, i.e., Default User Space is the coordinate system of the paper the page will be printed on.
However, we all know a printer cannot print to the edge of the paper. There is a margin between the actual printed material and the edge of the paper. The boundary of this margin is called the Crop Box. It’s what the user sees on the screen when the page is displayed in Acrobat. In the Acrobat display, the space inside the Crop Box is given a white background and everything outside the Crop Box is invisible (except for one special case I won’t get into here).
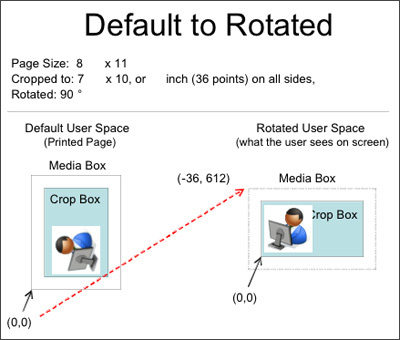
The actual printed portion of a page (the Crop Box) might be oriented as portrait, landscape, or even upside-down. So the user’s view of the page might be rotated from the paper it’s printed on. Rotated User Space is the user’s view of the page, i.e., the cropped rotated view of the page. The origin of Rotated User Space is the bottom left corner of the Crop Box. Figure 2 shows how this works for a page printed on a standard letter size piece of paper with a landscape view.

Figure 2 – Converting from Default to Rotated User Space
Converting Coordinates
To place an annotation at a specific page location relative to the user’s view, we need to use the coordinate system that represents the user’s view, i.e. Rotated User Space. Since the doc.getPageBox() function returns the coordinates in Rotated User Space, this is a fairly easy task. This is good, but we do have a problem. Both the addLink() and addAnnot() functions take coordinates in Default User Space, so we have to do a conversion to actually place the annotation. Unfortunately, the official Acrobat documentation isn’t much help on this score, unless you look carefully at the examples. Sample 2 of the entry for the doc.addLink() function in the Acrobat JavaScript Reference shows how to use an undocumented object to do just what we need, the “Matrix2D” object. This object was created specifically for transforming coordinates and has a lot of functionality in it, more than we need. You can see everything it does by simply typing “Matrix2D” into the Acrobat JavaScript Console and pressing Enter. All the code for the entire object will be displayed. For our purposes, we only need to know a couple things: how to create a Matrix2D that will do our transform, and how to apply it.
To get a Matrix for converting from Rotated User Space (user’s view) to Default User Space (Printed Page View), use this line of code:
var mxFromRot = (new Matrix2D).fromRotated(this,this.pageNum);
Since Matrix2D is an object, we have to use the “new” operator to create a new Matrix2D object. From this new object, we immediately call the fromRotated() function, which automatically sets up the matrix for converting from Rotated to Default User Space. This is exactly what we want. As an example, the following code places a “Square” Markup Annotation around the page’s BBox, or bounding box. The BBox is the smallest box that can contain the all of the page’s real content. Usually, this is the text and drawn content the user sees on the screen, but it can also contain some unseen things.
// Get Conversion Matrix, this is the conversion from
// Rotated Space to Default Space, i.e., from field coords
// to annot coords. This is what we want.
var mxFromRot = (new Matrix2D).fromRotated(this,this.pageNum);
// Convert pages BBox to annot coords.
var rctBBox = this.getPageBox("BBox",this.pageNum); var rctAnnot = mxFromRot.transform(rctBBox);
// Add square annot
this.addAnnot({type: "Square", page:this.pageNum, rect:rctAnnot });
Notice the conversion is done with the transform() function. This function takes an array of X/Y coordinates. It doesn’t matter how many pairs of coordinates are passed in, it’s only important that they are in a flat array with X values at even indices and Y values at odd indices. The function converts each pair from Rotated User Space into Default User Space. To review, only two Matrix2D functions are needed for the conversion, fromRotated() and transform().
Now, if we want to go the other way (from Default to Rotated User Space), we only need one more Matrix2D function, the invert() function. This literally inverts the matrix so we can do the transformation in the other direction.
A sample showing conversions in both directions is in this file, “ConvertingPageCoords_Sample.pdf.” All code is in the “MouseUp” button scripts. This PDF file is for demonstration only. Code for automatically placing annotations and form fields is intended to be used from a folder-level automation script, not a document script as in this example. As is, the example will not run in Adobe Reader. However, it will work in Reader if Reader Enabling Rights are applied from the “Advanced” menu in Acrobat 8 Professional.
Also check out the Matrix2D and annotation examples in the Acrobat JavaScript Reference.
http://www.adobe.com/devnet/acrobat/
Click on the Documentation tab and scroll down to the JavaScript section.
Related topics: |
Review and Comment, JavaScript |
Top Searches: |
Start a PDF review comment on your mobile deviceEdit PDF create PDF Action Wizard |
Try Acrobat DC
Get started >
Learn how to
edit PDF.
Ask the Community
Post, discuss and be part of the Acrobat community.
Join now >


2 comments
Comments for this tutorial are now closed.
Thom Parker
6, 2016-03-07 07, 2016Peter, Please read this article
https://acrobatusers.com/tutorials/dynamic_stamp_secrets
And then ask any further questions on the forums.
Peter Maas
5, 2016-03-04 04, 2016Perhaps,
I remember I had two different ways to set the coordinates for the stamps. One of them had it set in the bottom left, and this one positions it in the topleft. So that’s what I started with. I don’t see where I can have the scripts that you mention have an influence on my PDF and Action. If you like, I can send you an example file.
Thom Parker
5, 2013-04-01 01, 2013A partial example is shown in the text of this article. For placement purposes a square is pretty much the same as an annotation. You’ll also find an example in the download file linked above, and in this article:
http://acrobatusers.com/tutorials/auto_placement_annotations
More, better examples of placement can be found in the All About PDF Stamps book linked Here:
http://www.pdfscripting.com/public/All-About-PDF-Stamps-in-Acrobat-and-Paperless-Workflows-The-Book.cfm
Derek
3, 2013-03-28 28, 2013This is fascinating. I’m not sure how to apply this to automate placement of something like a stamp, though. Say I wanted options to be able to place a stamp in a particular corner of a document? How would that work?
Comments for this tutorial are now closed.